June 14th, 2019
  Nilesh Chaurasia
 Arduino Button or Switch Interface Circuit
To take digital input we have to interface button or switch with the Arduino board. Interfacing switch is requires a resistor and it is known as pull up resistor.
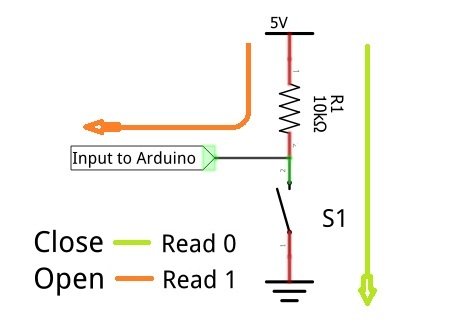
Figure 1 below shows the circuit diagram of button interfacing. It is having a 10k resistance which is connected with VCC (5 Volt).
The operation of the circuit is very easy and to understand and we have to divide operation in two cases.
Case 1 is when switch S1 is open (not pressed), the current flows from VCC to the input pin via resistance and Arduino read the state as HIGH (1 or TRUE).
Case 2 is when switch S1 is close (pressed), the current flows from VCC to the ground pin via resistance and Arduino read the state as LOW (0 or FALSE).
The digital signal transition from LOW to HIGH is known as “Pull Up” action. And because resistance R1 provide the current for this transition, it is known as pull up resistance. The digital signal transition from HIGH to LOW is known as “Pull Down” action.
Arduino Internal Pull Up Option in pinMode Function
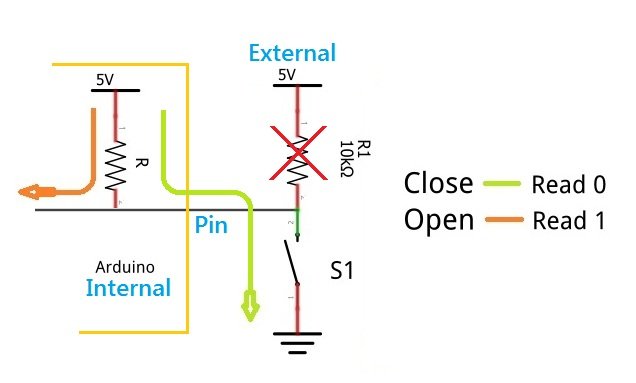
Arduino Microcontrollers also support internal pull up, means if you activate internal pull up you need not to connect a resistance and VCC externally.
If you use internal pull up, external circuit becomes very simple. In this case you don’t required VCC and resistance, just a switch and ground.
The figure 2 below shows the circuit diagram of switch interfacing without external pull up resistance.
Set pin 12 into input mode with internal pull up option
pinMode(12,INPUT_PULLUP);
Set pin 12 into input mode without internal pull up option or simple input
pinMode(12,INPUT);
The above code snippets clearly shows the difference in the internal pull up syntax.
Arduino Button or Switch Interface Without Pull Up Resistor
In the above discussion it is clear that we have to omit or eliminate the external pull up resistance from the circuit, because now we have activated the internal pull up.
The figure 3 shows the breadboard connection of the test setup for this experiment.
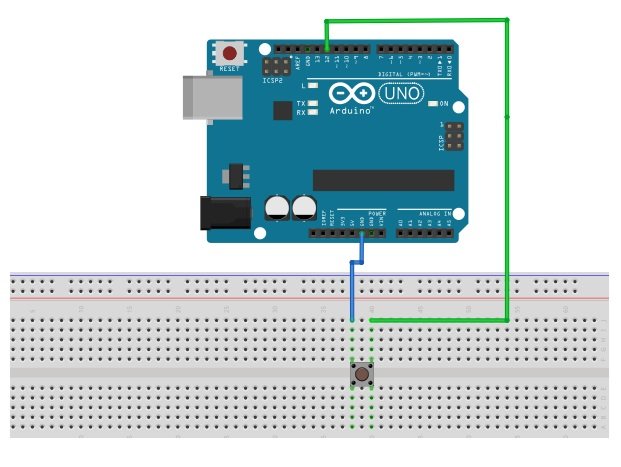
Caution: It is necessary to use INPUT_PULLUP option in pinMode if you don’t have external resistance, otherwise Arduino is not able to read logic 1 (HIGH).
Arduino LED Control With a Button having Internal Pull Up
Controlling a LED with button is one of important learning because it cover “How to take digital input”. Second learning is if decision logic application.
To implement this experiment you have to interface switch with Arduino on pin number 12, without external resistance. And we use build-in LED on pin number 13.
Example 1 – Arduino LED Control by Button
/*
	Arduino LED Control
	https://elextutorial.com
	Turns on LED by pressing a switch or button.
*/

void setup()
{
	pinMode(13, OUTPUT);	// set pin 13 as an output, the pin having onboard LED.
	pinMode(12, INPUT_PULLUP);	// set pin 12 as an input with internal pull up.
}

void loop()
{
	int x = digitalRead(12); // read the pin number 12
	if( x == 1)
	{
		digitalWrite(13, HIGH); // turn the pin 13 HIGH means on (set)
	}else
	{
		digitalWrite(13, LOW); // turn the pin 13 LOW means off (reset)
	}
	delay(100); // delay for 100 milli second
}
Arduino can be interface with button or switch using a Pull Up Resistor, but it is also possible to interface without resistor circuit with input_pullup option in the pinMode function.
 Posted in
  Tags:
Tags: