June 15th, 2019
  Nilesh Chaurasia
 Arduino Serial read
Arduino serial library have in-built function to receive the data over serial port. To test the receive function in Arduino you have to send data from PC/Laptop with serial monitor program.
In this article we will tell you more about serial communication in the Arduino to implement receive function.
Arduino library have a built-in function called “read” which is used to receive the serial port data. Arduino serial port keep all the received data in buffer, you can say a memory. It means the read function actually read the serial buffer.
If you read the serial buffer without received data it may read a garbage value, to solve this problem Arduino the library have another function called available. This function is used to check the status of serial receive buffer.
If something is received in the buffer the function available will return true otherwise return false.
It means if you want to receive data you have to first test the status with the help of available function, if available function return true then you can read the buffer in the variable.
If the serial buffer is empty and available function return false and there is no need to read the buffer.
It means most of the time available function is also used in the code example to test the availability of one or more byte in the buffer.
Arduino Serial read Function Example
As we have already discussed the “read” function actually read the serial buffer and return the value.
The “read” function actually return the value in “int” type, means the ASCII value of the character. You can review the ASCII table to see the decimal value of any character.
Read the first character from the serial buffer into the int type variable x.
int x = Serial.read();
Caution: If there is no data in the buffer, the “read” function return -1. It means if not received any data the “read” function return -1, otherwise ASCII value of character received.
Read the data in the char type you have to write.
char inChar = (char)Serial.read();
This code syntax is used type casting from int to char.
Arduino Serial available Function
Arduino serial library have a function called available, which will return a boolean value based on the status of the received buffer.
If new data is received in the buffer the available() function return true, and when buffer is empty it will return false.
As we have seen when nothing to read in the buffer the “read” function return -1. And we have to check every time something really received or not in the if logic.
Reading empty buffer again and again and then test for -1 is not good practice. It is better to check with available() function first and then read the buffer only when available function return true.
Syntax of available function.
bool x = Serial.available();
Note: Most of the time the Serial.available() is used inside the if logic, as shown below.
Arduino Serial available Function Example
	if(Serial.available())
	{
		int data=Serial.read();
		. . .
	}
Example 1 – Serial receive code syntax with read function
/*
	Arduino serial read or receive test code
	https://elextutorial.com
*/
void setup()
{
  Serial.begin(9600);// Set the baud rate to 9600
}
void loop()
{
  int data1 = Serial.read(); // read the data from the buffer in the int type variable.
  if(data1 == -1) // Check something really received or not
  {
      Serial.write("Not Received\n"); // Display the "Not Received" in the serial monitor window if data1 is -1.
  }
  else
  {
      Serial.write(data1); // If valid data send back to PC/Laptop.
  }
  delay(1000); // Wait for 1 second for next read.
}
The above code is a simple test for the read function. After every one second the read function is called and the data from the buffer is stored in the data1 variable.
And finally send back the received data the PC/Laptop, and if nothing is received send the string “Not Received”.

Fig.1 shows characters received back, which I have sent from serial monitor. And many times “Not Received”, because if I have not sent anything Arduino will send back this string.
Example 2 – Serial receive code syntax with read and available function
/*
	serial read or receive test code and available function
	https://elextutorial.com
*/
void setup()
{
	Serial.begin(9600);// Set the baud rate to 9600
}
void loop()
{
	if(Serial.available()) // Check something really received or not
	{
		int data1 = Serial.read(); // read the data from the buffer in the int type variable.
		Serial.write(data1); // data send back to PC/Laptop.
	}
	else
	{
		Serial.write("Not Received\n"); // Display the "Not Received" in the serial monitor window if available return false.
	}
	delay(1000); // Wait for 1 second for next test.
}
The above code is doing the same thing but with available() function.
Arduino Serial UART Loopback Test
Serial Loop back test program is the first program to test whether the serial port of PC/Laptop and Arduino is working properly or not.
In this program we will read the buffer when Arduino received something and send it back to the PC/Laptop.
Example 3 – Arduino Serial UART Loopback Test Code for testing purpose.
/*
	serial read or receive test code and available function
	https://elextutorial.com
*/
void setup()
{
  Serial.begin(9600); // Set the baud rate to 9600
}
void loop()
{
  if(Serial.available()) // Check if received
  {
      int data1 = Serial.read(); // Read if received
      Serial.write(data1); // Send back to PC/Laptop
  }
}
This code is a basic code but very useful in testing the serial port operation in Arduino.
If works perfectly fine, you will receive any character send to the Arduino in the serial monitor window.
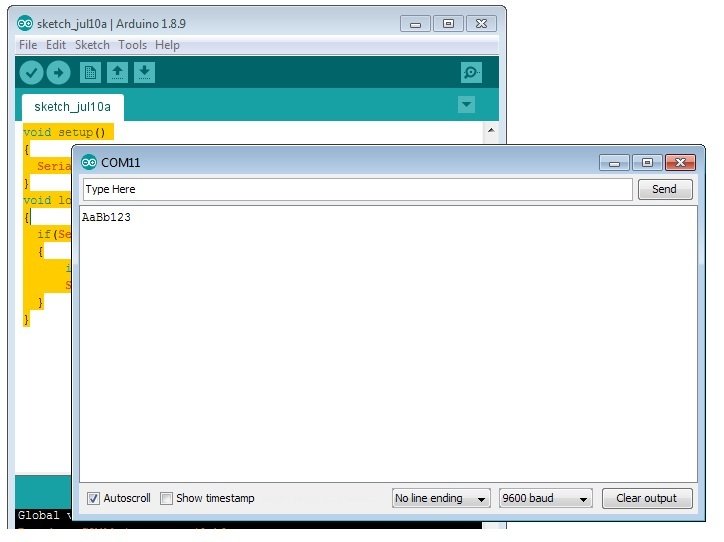
Fig.2 shows some characters received back, which I have sent from serial monitor.
 Posted in
  Tags:
Tags: