CSS Padding
If you are not using padding all the content of p are very close to the border and it does not look beautiful that is why with the help of padding property you can make text of the paragraph at a distance from the border of the elements. That makes your design looks more beautiful.
Example 1 – Div and p tag Padding Example and Uses
<!DOCTYPE html>
<html>
  <head>
    <style>
	  div
		{
		 background-color:yellow;
		 padding:20px;
		}
	   p
		{
		 color:green;
		 background-color:orange;
                 margin:0;
		}
	</style>
  </head>
  <body>
    <div>
		<p>
		  Lorem ipsum dolor sit amet, consectetur adipiscing elit, sed do eiusmod tempor incididunt ut labore et dolore magna aliqua. Ut enim ad minim veniam, quis nostrud exercitation ullamco laboris nisi ut aliquip ex ea commodo consequat. Duis aute irure dolor in reprehenderit in voluptate velit esse cillum dolore eu fugiat nulla pariatur. Excepteur sint occaecat cupidatat non proident, sunt in culpa qui officia deserunt mollit anim id est laborum.
		</p>
	</div>
  </body>
</html>
The above syntax shows that how can you use the padding.
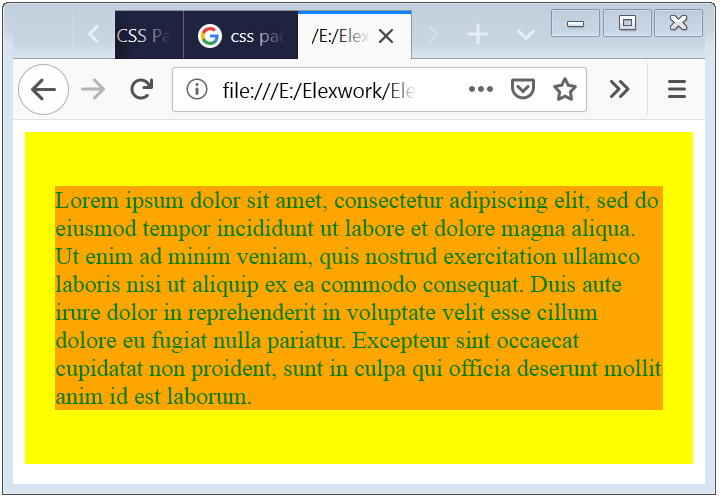
The bellow image shows the result of using padding and here a paragraph inside a div and have the padding of 20px and this space is showing by the color yellow.
Note : Instead of px (pixel) you can specify the padding value in % (percentage) also. The percentage is calculated based on the width of the element.

Note: The browser will have by default margin for paragraph element, that’s why it is necessary to set the margin 0 to remove margin from the paragraph element.
Padding Short-Hand Syntax for 2 Values
If you want to apply different spacing for top-bottom and left-right, than you can use 2 value syntax. First value specify for top and bottoms. And second value for left and right padding.
<!DOCTYPE html>
<html>
  <head>
    <style>
	  div
		{
		 padding:20px 40px;
		}
	</style>
  </head>
</html>
Padding Short-Hand Syntax for 3 Values
If you want to apply different spacing for top, left-right and bottom, than you can use 3 value syntax. First value shows for top, than second value shows for left and right. And last value shows for the bottom.
<!DOCTYPE html>
<html>
  <head>
    <style>
	  div
		{
		 padding:20px 40px 50px;
		}
	</style>
  </head>
</html>
Padding Short-Hand Syntax for 4 Values
If you want to apply different spacing for top, left, right and bottom, than you can use 4 values syntax. First value shows for top, than second value shows for right, than third value shows for bottom, and last value shows for the left.
<!DOCTYPE html>
<html>
  <head>
    <style>
	  div
		{
		 padding:20px 40px 60px 75px;
		}
	</style>
  </head>
</html>
Example 2 – Short-Hand Padding Property
<!DOCTYPE html>
<html>
  <head>
    <style>
	  div
		{
		 background-color:olive;
		 padding:20px 40px 60px 10px;
		}
	   p
		{
		 color:white;
		 background-color:darksalmon;
		 margin:0;
		}
	</style>
  </head>
  <body>
    <div>
		<p>
		  Lorem ipsum dolor sit amet, consectetur adipiscing elit, n ullamco laboris nisi ut aliquip ex.
		</p>
	</div>
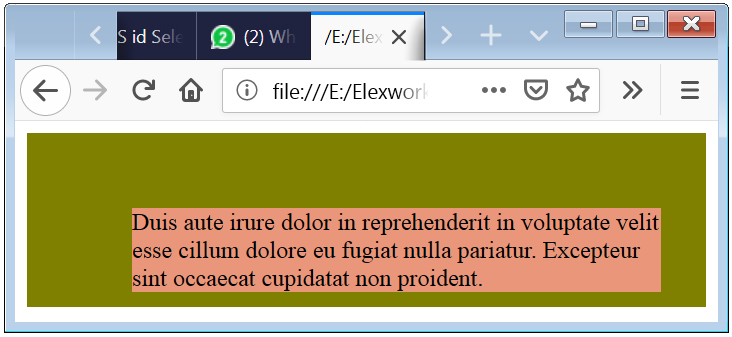
The above code shows that how can you apply the padding to the different position.

CSS Individual Padding Properties for Bottom, Top, Left and Right Setting
If you want to apply different spacing to the left, right, top and bottom than you can use Individual Or Short-Hand properties syntax. Short-Hand padding is describe previously, now we can discuss about the Individual Padding. In Individual Padding you can apply padding for different position separately. You have to just use the bellow syntax to apply the padding.
Individual Padding Properties
| CSS Individual Padding Properties | Syntax |
|---|---|
| padding-top | padding-top: 10px; |
| padding-bottom | padding-bottom: 20px; |
| padding-left | padding-left: 30px; |
| padding-right | padding-right: 40px; |
Example 3 – CSS Individual Padding
<!DOCTYPE html>
<html>
  <head>
    <style>
	  div
		{
		 background-color:olive;
		 padding-top: 50px;
		 padding-right: 30px;
		 padding-bottom: 10px;
		 padding-left: 70px;
		}
	   p
		{
		 color:darkblack;
		 background-color:darksalmon;
		 margin:0;
		}
	</style>
  </head>
  <body>
    <div>
		<p>
		 Duis aute irure dolor in reprehenderit in voluptate velit esse cillum dolore eu fugiat nulla pariatur. Excepteur sint occaecat cupidatat non proident.
		</p>
	</div>
  </body>
</html>
The above code shows that how can you apply the padding to the different position using the Individual Padding.
Mainly Individual Padding is used where, you have to just apply padding for one position.

Caution: You should have to put only positive values because negative values are prohibited.

 March 4th, 2019
  Nilesh Chaurasia
  Posted in
  Tags:
Tags: 


Hello! I’m at work browsing your blog from my new iphone! Just wanted to say I love reading through your blog and look forward to all your posts! Keep up the excellent work!