 April 9th, 2019
  Nilesh Chaurasia
 Interfacing ESP8266 With Arduino Uno
The Arduino Uno is one of the most popular Arduino Board available in the market today. And ESP8266 is a WiFi Module used to access internet over tiny embedded devices.
Interfacing ESP8266 With Arduino is somewhat tricky because it involve many complexity. Mainly because
- Arduino Uno works on 5 Volt and ESP8266 Work on 3.3 Volt.
- ESP8266 is interfaced with Serial port of Ardino (RXD and TXD pins).
- ESP8266 and Arduino hardware connection is also complex.
- ESP8266 receive AT commands in proper format only.
- ESP8266 reply in text string format, and Arduino need to analyze the reply and operate accordingly.
Warning: Please make sure connect 3.3 volt power to the ESP8266 otherwise it may damage your ESP8266.
Interfacing ESP8266 With Arduino Uno Hardware Connection
ESP8266-01 have 8 pins. And you have to connect to the 3.3 volt, ground, TXD and RXD pins of Arduino Uno.
- Connect the Arduino’s 3v3 (3.3V) output to the VCC, RESET and CH_PD of ESP8266-01.
- Connect GND (ground) to the GND of ESP8266.
- Connect Pin 0 (RXD) of Arduino to the TX pin of ESP8066.
- Connect the Pin 1 (TXD) of the Arduino to the RX pin of the ESP8266.
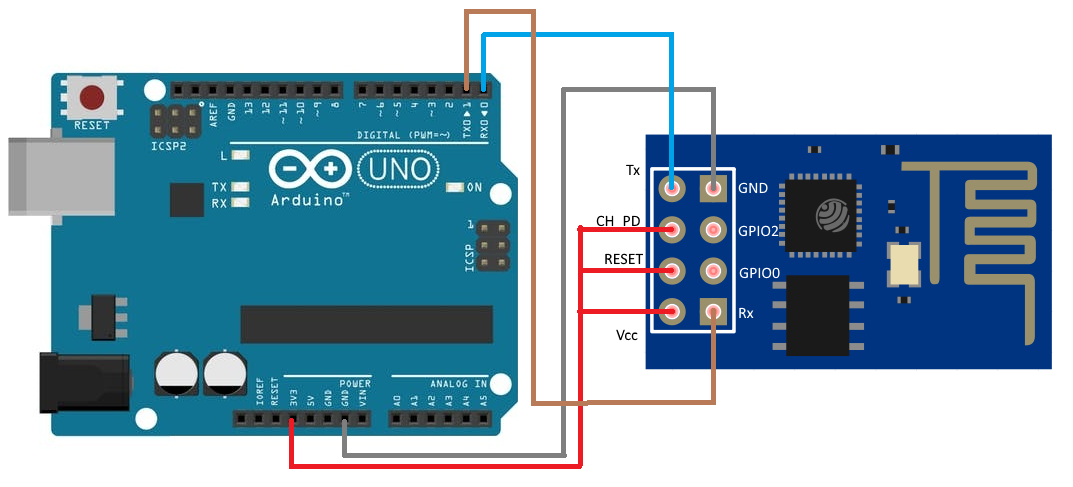
Fig 1 Clearly shows how you can connect Arduino with the ESP8266-01.
Using ESP8266 With Arduino Uno
The ESP8266 is works on AT commands. If everything works perfect and when we send AT to the ESP, the ESP reply back OK.
Reply of OK when we send AT is just a test that my ESP8266 is connected properly, receiving and processing the commands as well.
Testing ESP8266 With Arduino is somewhat tricky because, every AT command is need to be terminated by (CR and LF) special characters.
CR is known as Carriage Return and LF is known as Line Feed character.
Example: Using ESP8266 With Arduino Uno code is implemented to send AT command to ESP8266.
#include<stdlib.h>
int ledPin = 13;

void setup() {
    pinMode(ledPin, OUTPUT);
    Serial.begin(115200);
    digitalWrite(ledPin, HIGH);
}

void blink_fun() {
    digitalWrite(ledPin, LOW);
    delay(500);
    digitalWrite(ledPin, HIGH);
    delay(500);
    digitalWrite(ledPin, LOW);
    delay(500);
    digitalWrite(ledPin, HIGH);
    delay(500);
}

void loop()
{
    String cmd = "AT\r\n";
    Serial.print(cmd);
    if(Serial.find("OK"))
    {
        blink_fun();
    }
    else
    {
        digitalWrite(ledPin, HIGH);
    }
    delay(15000);
}
This Arduino code send the AT\r\n command to the ESP8266 and see the reply. If reply (OK) then Arduino blink the LED on pin number 13, otherwise the LED is continuously on.
Caution: The Arduino code blink the LED on pin 13, if Arduino receive the OK from ESP8266.
Note: This Ardino code does nothing simply sends (AT\r\n) \r is CR and \n is LF. This two character is need to terminate the AT command, without these character ESP8266 will not process the command.
Example: Using ESP8266 With Arduino Uno code is implemented to Device Control Application.
#include <stdlib.h>
#include <LiquidCrystal.h>
// initialize the library with the numbers of the interface pins
LiquidCrystal lcd(7, 6, A0, A1, A2, A3);
String cmd;
int ledPin = A5;
int RELAYPin = 13;

void esp_find()
{
  while(1)
  {
     String cmd="AT\r\n";
     Serial.print(cmd);
     if(Serial.find("OK"))
     {
       lcd.clear();
       lcd.print("ESP FOUND");
       delay(3000);
       break;

     }
    else
    {
      lcd.clear();
      lcd.print("ESP NOT FOUND");
      delay(2000);
    }
  }
}

void wifi_conn()
{
   while(1)
   {
              cmd = "AT+CWJAP=\"NILESH\",\"12345678\"\r\n";
              Serial.print(cmd);
              if(Serial.find("WIFI CONNECTED"))
              {
                  lcd.clear();
                  lcd.print("WIFI CONNECTED");

                  break;
              }
              else
              {
                  lcd.clear();
                  lcd.print("WIFI NOT CONNECTED");
                  delay(2000);

              }
  }
}

void wifi_check_ip()
{
   while(1)
   {
              cmd = "AT+CIFSR\r\n";
              Serial.print(cmd);
              if(Serial.find("0.0.0.0"))
              {

                  lcd.clear();
                  lcd.print("IP NOT ASSIGN");
                  delay(2000);
              }
              else
              {
                  lcd.clear();
                  lcd.print("GOT IP");
                  break;

             }

  }
}

void internet_check1()
{
    while(1)
    {
        cmd="AT+CIPSTART=\"TCP\",\"166.62.28.120\",80\r\n";
        Serial.print(cmd);
        delay(10000);
        if(Serial.find("CONNECT"))
        {
           lcd.clear();
           lcd.print("INTERNET AVAILABLE");
           break;
        }
        else
        {
          lcd.clear();
          lcd.print("INTERNET NOT AVAILABLE");
          delay(4000);
        }

    }
}

void internet_check2()
{
   cmd="AT+CIPCLOSE\r\n";
   Serial.print(cmd);
   delay(5000);

       cmd="AT+CIPSTART=\"TCP\",\"166.62.28.120\",80\r\n";
      Serial.print(cmd);
       if(Serial.find("CONNECT"))
      {
         lcd.clear();
         lcd.print("INTERNET AVAILABLE");

      }
      else
      {

        lcd.clear();
        lcd.print("INTERNET NOT AVAILABLE");
        delay(4000);

      }


}

void wifi_config()
{
    String cmd = "AT+CWMODE=1\r\n";
    Serial.print(cmd);
    delay(2000);
//    cmd = "AT+CWLAP\r\n";
//    delay(1000);

    while(1)
    {
      cmd = "AT+CIPMUX?\r\n";
      Serial.print(cmd);
      delay(1000);
      if(Serial.find("+CIPMUX:0"))
      {
        lcd.clear();
        lcd.print("SINGLE CONN");
        delay(1000);
        break;
      }
      else
      {
        lcd.clear();
        lcd.print("MULTIPLE CONN");
        delay(1000);

      }
    }

}
void setup()
{
    pinMode(ledPin, OUTPUT);
    pinMode(RELAYPin, OUTPUT);
    lcd.begin(16, 2);
    Serial.begin(115200);
    delay(100);
    esp_find();
    wifi_config();
    wifi_conn();
    wifi_check_ip();
    internet_check1();

}
void blink_fun() {
  digitalWrite(ledPin, HIGH);
  delay(500);
  digitalWrite(ledPin, LOW);
  delay(500);
  digitalWrite(ledPin, HIGH);
  delay(500);
  digitalWrite(ledPin, LOW);
  delay(500);
}
 void Relay_status()
 {
    String cmd = "AT+CIPSTART=\"TCP\",\"166.62.28.120\",80\r\n";
    Serial.print(cmd);
    blink_fun();
    String getStr = "GET http://iottest.novel-technology.com/readrelay1.php";
    getStr += "\r\n\r\n";
    cmd = "AT+CIPSEND=";
    cmd += String(getStr.length());
    cmd += "\r\n";
    Serial.print(cmd);
    delay(10);
    //blink_fun();
    Serial.print(getStr);
    if(Serial.find("+IPD,3:1"))
    {
      digitalWrite(RELAYPin, HIGH);
    }
    else
    {
        digitalWrite(RELAYPin, LOW);
    }

    delay(5000);
    //delay(5000);
    delay(5000);
 }

void loop()
{
     Relay_status();
     //delay(500);
     internet_check2();
    delay(2000);
    wifi_check_ip();
    delay(2000);
}
This Arduino code Read Relay.
 Posted in
  Tags:
Tags: 


I’m gone to inform my little brother, that he should also go to see this website on regular basis to obtain updated from most up-to-date information.
Attractive component of content. I just stumbled upon your site and in accession capital to say that I acquire in fact enjoyed account your weblog posts.
Anyway I will be subscribing on your feeds and even I fulfillment you get
entry to constantly quickly.
I am not sure where you are getting your information, but great topic.
I needs to spend some time learning much more or understanding more.
Thanks for fantastic information I was looking for this info for my mission.
Its such as you learn my mind! You appear to know a lot approximately this,
such as you wrote the ebook in it or something.
I believe that you simply can do with a few percent to
power the message home a little bit, however other than that, this is
wonderful blog. A great read. I’ll definitely be back.
I will immediately grasp your rss as I can not to find your e-mail subscription hyperlink or e-newsletter service.
Do you’ve any? Please allow me know in order that I may subscribe.
Thanks.
You could certainly see your expertise in the article you write.
The sector hopes for even more passionate writers such as you who aren’t afraid
to mention how they believe. All the time go after your heart.
We are a group of volunteers and opening a new scheme
in our community. Your web site offered us with valuable info to work on.
You have done a formidable job and our entire community will be grateful to you.
Great blog right here! Additionally your web site loads up fast!
What web host are you the use of? Can I get your affiliate
hyperlink to your host? I wish my site loaded up as quickly as
yours lol
It is in point of fact a nice and helpful piece of information. I am satisfied that you shared this
useful information with us. Please stay us informed like this.
Thank you for sharing.
Hurrah, that’s what I was exploring for, what a information! existing here at this website, thanks admin of this web site.