 June 15th, 2019
  Nilesh Chaurasia
 Arduino Serial Port Communication
Arduino Serial Communication is used to communicate over serial port with terminal devices over UART like PC.
Understanding the serial communication in the Arduino is very important because these days many devices uses UART interface, like GPS, ESP8266, GSM and RFID modules.
The UART serial communication is a full duplex, means the devices have different data lines for send and receive signals.
Most of the time send line is marked as TX (Transmit Signal) and receive line is marked as RX (Receive Signal).
Figure 1 below shows the connection diagram of Arduino with PC serial port.
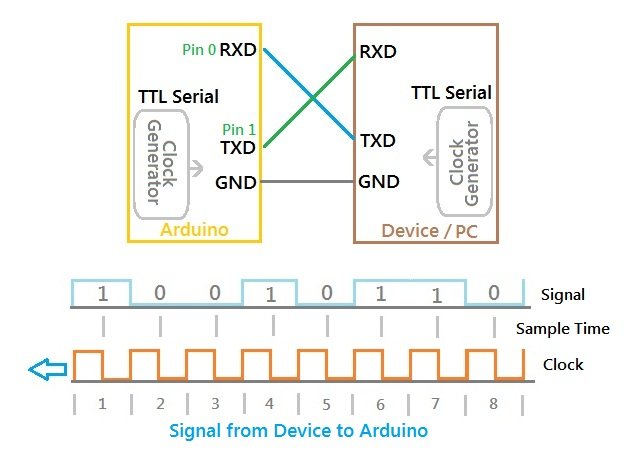
The UART communication is a “Asynchronous Communication”, means both devices does not share the common clock. Both devices having there own clock, but the timing must be same. The clock generator shown in the figure 1 generate the same baud rate clock.
Note:Digital I/O pin 0 is the RX signal and the pin 1 is the TX signal in Arduino Uno board.
The speed of communication is measured in bits per second and it is also known as the “Baud Rate”. Both of the devices must have same baud rate for proper communication.
Caution:The Arduino UART is works on TTL voltage level, means 0 to 5 volt. And PC serial port works on RS232 standard which is -13 to +13 volt. That means you need a level converter like MAX232 IC.
Note:If you need to interface the Arduino serial port with PC USB port then you have to use devices USB to UART converter like CP2102 or CH341 modules.
Arduino Serial Begin and Baud Rate
Arduino library having a function called begin to set the baud rate and initialize the serial port. Mostly this begin function is called in the setup() function.
Set the baud rate to 9600, which is one of the common baud rate most devices by default uses.
Serial.begin(9600);
Set the baud rate to 115200.
Serial.begin(115200);
Arduino Serial write
Arduino library have a function called write which will send the data over the serial TX pin.
Send the character “B” with specified baud rate to the receiving device.
Serial.write(“B”);
Send the word “Welcome” with specified baud rate to the receiving device.
Serial.write(“Welcome”);
Arduino Send Data with write Function Example Code
Arduino serial send test code shows how to use both the function begin and write.
Example 1 – Arduino serial send or write test code.
/*
	Arduino serial send test code
	https://elextutorial.com
	This code will send "B" to the PC with a delay of 2 seconds.
*/

void setup()
{
	Serial.begin(9600);//Set the baud rate 9600
}

void loop()
{
    Serial.write("B");   // send A out serial
    delay(2000);   // wait for 2 seconds to send again
}
This program send char “B” over serial port to PC at a baud rate of 9600 continuously with delay of 2 seconds.
Arduino Serial Test on Serial Monitor Window
Arduino IDE software have a built-in serial terminal small tool to test the communication project. It is known as Serial Monitor.
To start the Serial Monitor go to the menu Tools > Serial Monitor. Arduino Uno have on board USB to Serial converter like CP2102 or CH341.
Note: You have to set the baud rate to 9600 in the serial monitor, so that both Arduino and terminal set to same baud rate.

Caution: It is necessary to set the port properly from menu Tools > Port. The COM port you have selected in this setting must be of Arduino.
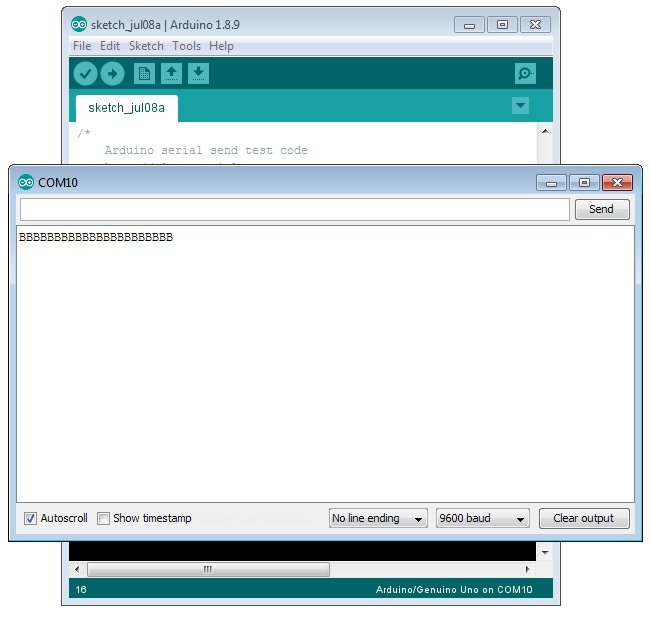
If everything works perfect serial receive window shows BBBB, with a delay of 2 seconds in between new or next B. Shown in the below figure 3.
 Posted in
  Tags:
Tags: 


Awsome website! I am loving it!! Will be back later to read some more. I am taking your feeds also.